Posts

Showing posts from November, 2011

Animal Drawing: Bush Baby

Image
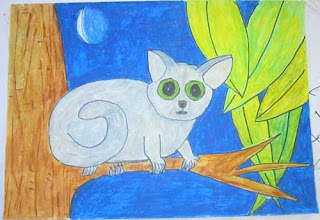
The Senegal Bushbaby which is a small, nocturnal primate . The name "bush baby" may come either from the animals' cries or from their appearance. They are agile leapers, and run swiftly along branches. They live in Africa south of the Sahara and nearby islands including Zanzibar. They tend to live in dry woodland regions and savannah regions. They are small primates with woolly thick fur that ranges from silvery grey to dark brown. They have large eyes, giving them good night vision ; strong hind limbs; and long tails, which help their balance. In this lesson we work on scale and proportion of the Bush Baby, using color to create space and depth. Materials: Sketching pencil, color pencils or watercolor pencils, drawing paper Step #1: Draw light guidelines down the center and across the middle of page. Draw a large oval in the middle and overlap a circle as shown. Step #2: Draw the Bush Baby large eyes, triangle nose, mouth and ears. Step #3: Draw a tree branch

Hand-Built Pottery/Clay Sculpture Class 12/2/11

Image
We have several spots available for our next clay sculpture/hand-built pottery class on December 2nd. The class is from 2:30 to 4pm and is $20 which includes all materials. We offer clay classes every other Friday, the next clay class is 12/16. The hand-built pottery and sculpture classes will be taught by Franny Hyde. The classes will take students through process of working with clay, using under glazes, glaze, and firing of their work . Click here for more information

Animal Drawing: Great Horned Owl

Image
One the favorite birds for students to draw is the owl, in this lesson we are inspired by wildlife artist Robert Bateman.   Great Horned Owl does not really have “horns” but tall tufts of feathers. When disturbed, the owl raises the tufts and sits very still so it can blend into the tree bark and hide. When it flies, the tufts are flat against the head. This owl has a wingspan of 3 feet but only weighs 9 ounces! Their lifespan is 25-30 years. I like to use watercolor materials for this project. Materials:  watercolor paper, sketching pencil, watercolor pencils or paint. Step #1: Draw some light guidelines down the center of the paper and through middle. Start with a curved line for the branch and a large oval for the owl. Step #2: Draw large circles at the top of the oval and and then add the large eyes. Draw the beak in between the eyes and add the large tufts of feathers that make up the owl's horns. Step #3: Draw feathers and wings. Then continue below the branch with th

Holiday Tree Landscape

Image
A perfect project for this time of year is abstract holiday tree landscapes. Materials; 140lb watercolor paper, oil pastels, acrylic paint wash, gel medium, tissue paper and white-out are optional How to make Acrylic Paint Wash; Use 2 parts water to one part Acrylic paint Mix in gel medium gloss Step #1: Draw a wavy line about 1/4 from the bottom of page with oil pastel crayon. Step #2: Draw three trees using a triangle shape for the top of tree Step #3: Add your choice of color to the trees ground and sky. Step #4: Use a large brush and add the Acrylic paint wash over the oil pastel Step #5: Optional; Cut triangles out of tissue paper and use the acrylic was to adhere them to trees Step #6: Optional: Use white-out to add snowflake effect Ava Hailey Bella Eli Olivia Reese Will

Animal Drawing: Reindeer

Image
One of my favorite illustrators is Sachiko Umoto , who has several great books on plants, people and animals. I am using her wonderful reindeer for our inspiration. Both male and female reindeer have antlers, which they shed every winter by the males and the spring by the females. Step #1: Draw the head , eyes, nose, ears and the antlers. Step #2: Draw a oval for the body and add a scarf-like mane. Step #3: Draw its thick legs, hooves and the short tail.

Getting Started Exercise #105 - Observational Drawing

Image
A exercise that helps me get started drawing is a continuous line observational drawing. One of the most famous continuous line artist is Paul Klee, he loved to do continuous line work of fish, birds, people and cats. For this exercise i am inspired by Paul Klee and use a wooden cat for my drawing. Step #1: I like to set the object about 6 inches to a foot away from the paper. Keep your eyes on the object and do not look at your paper. Step # 2: Slowly follow the shape of the object with your eyes. Imagine you're a little bug crawling around on the surface. Step #3: Now this time you are going to move your pencil with your eyes. In other words you are going to draw where you're eye is following. Don't pick your pencil up off the paper, this becomes a continuous line drawing. Wildlife artist practice this exercise daily. Step #4: Now lets try it again, with same object. Sometimes I will stop and reposition my pencil and start again.

Animal Drawing: Sleeping Panda Bear

Image
One of the most requested animals students like to draw is the panda bear. This project is a sleeping panda bear. Step #1: Start with some light pencil guidelines one down the center and one across the middle. Then place a large oval just above the center guideline for the panda's head. Step #2: Add the panda eye patches, triangle nose and the mouth. Then add the ears. Step #3: Connect the sleeping panda arm up near the middle of his head. The add a oval for the body. Step #4: Now add the tree branch around the sleeping panda. Step #5: Add bamboo trees behind the panda. Step #6 Finish your drawing with your choice of mediums, from oil pastels, pastel chalk, watercolor pencils.